Remote
Remote is a free and open source interface for managing Core Lightning nodes. The app syncs all node data into a single, secure, and localized hub. This enables seamless management and tracking across all connected nodes.
Getting Started
Prerequisites
- A Core Lightning node running version
0.12.0or later. - Command line access to generate a Rune authentication token.
Getting Help
If you need some help you can join our Discord server and ask a question. We’ll try and get back to you as soon as possible.
→ Discord
Let’s Go!
Download the desktop application or visit the browser app (PWA).
Encryption
When the you first open the app you will be prompted to encrypt all of the local app data stored on your device with a secure password. This means that your data at rest is always encrypted and will be loaded in to memory and decrypted when you enter your password. It is important that you choose a secure password, especially if you are going to grant the app permission to spend.
Every time you reload the app you will be prompted for this password. If you forget your password, you will have to reset the app which will delete all of the local data and Wallet connections. So make sure to store a backup of your secure password in a secure place - either in a password manager or offline.
Wallets
This is where you establish connections to multiple wallets to synchronize data and manage funds. Start by clicking the Add button then selecting the Core Lightning option.
Core Lightning
To connect your Core Lightning node you need to enter two things:
- Your Lightning Address
- A Rune to permit the app to perform some functions on your node.
Once you have input both, click the connect button to initiate a connection to your node. If connection is successful, you will see the a green connected status appear.
Advanced Options
Clicking "Advanced" will show some options for connecting to a node directly without using a WebSocket proxy, or for setting a custom WebSocket proxy URL to use instead of the Clams proxy.
For detailed instructions for connecting directly to a node, see the Testing Locally section.
How it Works
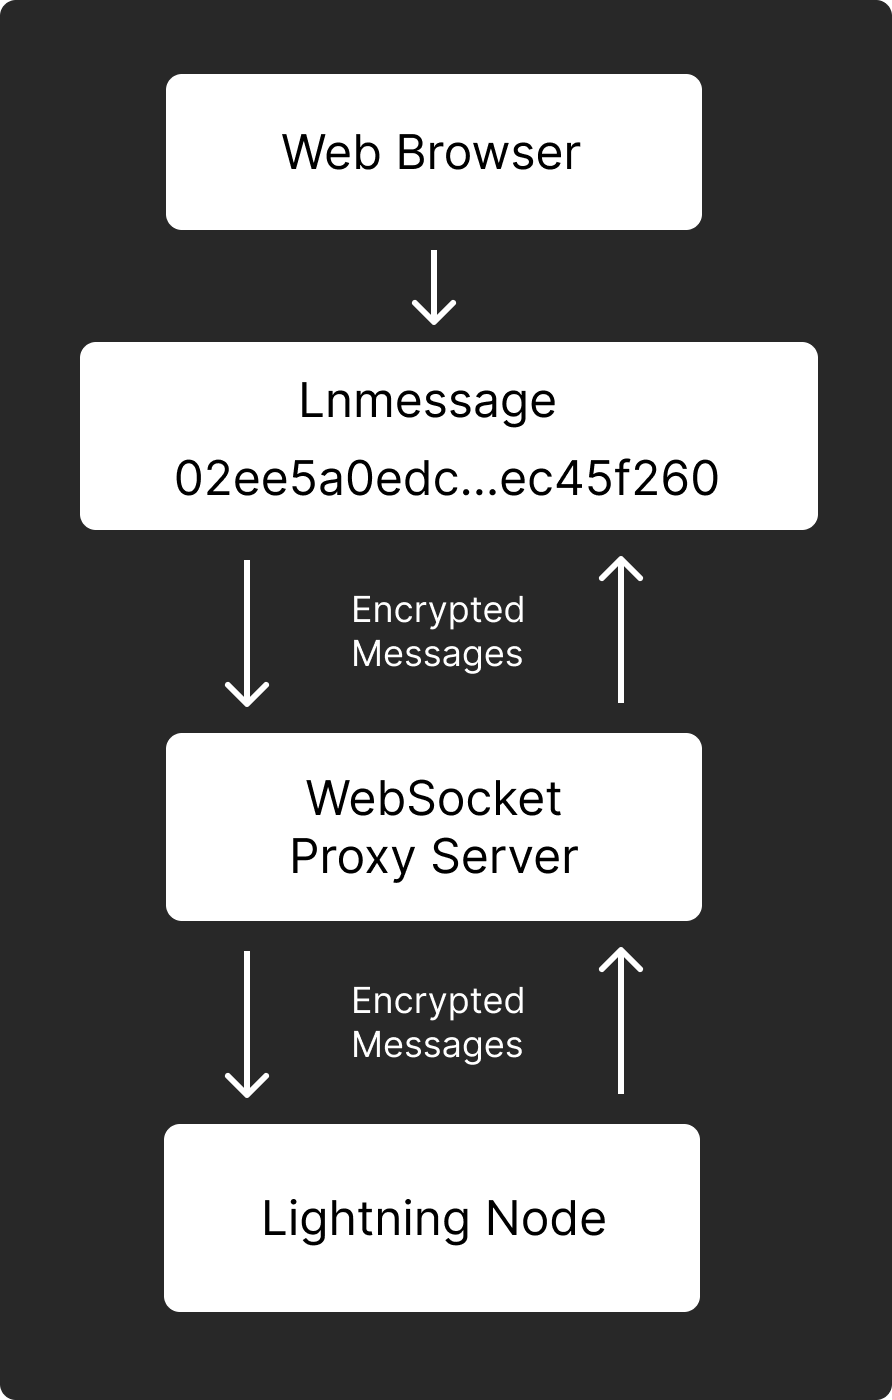
Remote uses a library called Lnmessage to spin up what can be conceptually thought of as an ultra light node that knows how to “speak” lightning, but does not implement the other features of the protocol. It will initiate a connection to your node like any other node would and uses the encrypted lightning transport protocol for all messages. In fact, once you have connected to your node, you can run the listpeers command and see it listed there in your peers like any other, except the feature bits are all set to zeros:
{
  "id": "02ee5a0edc498173a9765a0225be3e375c2693fa067ad6229c62e29948fb3a9138",
  "connected": true,
  "netaddr": ["[::ffff:192.168.69.1]:50258"],
  "features": "0000000000000000",
  "channels": []
}
When connecting from the browser, we need to use a WebSocket for connection that routes lightning messages via a trustless proxy server. The Clams proxy server accepts a connection from the browser, initiates a regular socket connection to your node and then just shuffles encrypted binary packets between the browser and your node. The proxy server is trustless since the server cannot decrypt any of the traffic that it sees. The decryption keys remain client side and never leave your device.
Info
A direct connection could be made to a CoreLn node over WebSockets thanks to the experimental-websocket-port config option, but typically most users will not have the required ssl certificate required to satisfy CORS connections within browsers so that option is not currently available.
Below is an architecture diagram demonstrating how the browser app communicates with a Lightning node via a trustless proxy server.
Troubleshooting
If you see a connection error after attempting to connect you can try the following steps to diagnose the problem:
- Use the
Recent errorsdropdown to help diagnose your issue. - Ensure your node is running by calling the
getinfomethod via the lightning CLI - Ensure that your node is reachable by pinging the IP address and port
- If the above are all working as expected, but you still cannot connect to your node via the Clams app, jump in to the Discord and ask for some help.
Authentication
Runes
To allow Remote to securely interact with your Core Lightning node, you will need to provide it with a valid authentication token with the appropriate permissions. Core Lightning nodes use rune authentication tokens to specify permission to provide fine grained access to the node RPC server via the Commando plugin.
The app is expecting a valid Base64 encoded rune that you can generate via the commando-rune method on your lightning cli. You can create a rune that gives the app whichever permissions you are comfortable with and the app will gracefully fail and display an error message where appropriate indicating if it does not have adequate permissions to perform an action initiated within the app.
To make life easier we provide you with some CLI recipes to create a rune. See the Rune CLI commands dropdown in the Wallets area when making a connection to your node for three options range from Read only to Admin. If you only want to provide permissions that cover all app functionality, then go for the Clams rune.
Session id
When you boot up Remote for the first time, a random public key is generated that can be conceptually thought of as a “session” id. The public key corresponds to a private key that will be stored locally and will be used when initiating a connection to your node, so the Remote app will always have a persistent node id when connecting. The purpose of this public key is that you can use it to restrict your rune so that only this node identity can use the provided rune. This provides an extra layer of security when working with runes that have the ability to send payments, which can be thought of as essentially private keys. The session secret, rune authentications token, and connection address are all stored in local storage on your device and you will encrypt these credentials with a secure password to ensure that they are only ever decrypted in memory. If you want to revoke access to your node, you can go in to the Wallets page and delete the connection.
Recipes
Here are some rune recipes for common permissions groupings that will quickly get you going, but feel free to read the rune documentation to tweak to your liking. All of the recipes below will be restricted to the node id: 031846f85514de33d0c807261aa4e801b5c0a45a3db5c1ffaf9af80eaff6ce330b, but when you run the command to create a rune, make sure you replace it with the public key that you were provided in the app. The public key can can viewed by copying the id from any of the Rune CLI commands options on the Core Lightning Wallet screen. Be very careful when sharing and handling runes as they can function basically like private keys depending on the restrictions. It is highly recommended to always restrict any runes to the provided public key. We have also added rate limiting to all rune recipes to ensure that your node cannot get overloaded with RPC calls. Replace all instances of id=0318.. with your session id.
Readonly
The following rune will allow read only access to your node and encodes the following permissions:
- Read the balance of funds
- List payment history
- Listen for invoice payments
- Can only make requests if the node has an id equal to the session public key
- Is rate limited to 60 requests a minute
#v0.12.x
lightning-cli commando-rune restrictions='["id=031846f85514de33d0c807261aa4e801b5c0a45a3db5c1ffaf9af80eaff6ce330b", "method^list|method^get|method=summary|method=waitanyinvoice|method=waitinvoice","method/listdatastore", "rate=60"]'

#v22.x.x
lightning-cli commando-rune restrictions='[["id=031846f85514de33d0c807261aa4e801b5c0a45a3db5c1ffaf9af80eaff6ce330b"], ["method^list","method^get","method=summary","method=waitanyinvoice","method=waitinvoice"],["method/listdatastore"], ["rate=60"]]'
_V6-OWCxC0uexq47DGclJg8bEPn7mAPx1VJ1XyPydhQ9MTMmaWQ9MDMxODQ2Zjg1NTE0ZGUzM2QwYzgwNzI2MWFhNGU4MDFiNWMwYTQ1YTNkYjVjMWZmYWY5YWY4MGVhZmY2Y2UzMzBiJm1ldGhvZF5saXN0fG1ldGhvZF5nZXR8bWV0aG9kPXN1bW1hcnkmbWV0aG9kL2xpc3RkYXRhc3RvcmUmcmF0ZT02MA==
Lightning Payments
The following rune will allow full app functionality and encodes the following permissions:
- Read the balance of funds
- List payment history
- Create invoices
- Pay invoices
- Send keysend payments
- Listen for invoice payment updates
- Sign messages (for LNURL Auth)
- Can only make requests if the node has an id equal to the session public key
- Is rate limited to 60 requests a minute
#v0.12.x
lightning-cli commando-rune restrictions='["id=031846f85514de33d0c807261aa4e801b5c0a45a3db5c1ffaf9af80eaff6ce330b", "method^list|method^get|method=summary|method=pay|method=keysend|method=invoice|method=waitanyinvoice|method=waitinvoice|method=signmessage","method/listdatastore", "rate=60"]'

#v22.x.x
lightning-cli commando-rune restrictions='[["id=031846f85514de33d0c807261aa4e801b5c0a45a3db5c1ffaf9af80eaff6ce330b"], ["method^list","method^get","method=summary","method=pay","method=keysend","method=invoice","method=waitanyinvoice","method=waitinvoice", "method=signmessage"],["method/listdatastore"], ["rate=60"]]'
KXmMos0AFEwsScl7EZ__CpfA4iT9mXcKI6nYq8_ZCS89MTQmaWQ9MDMxODQ2Zjg1NTE0ZGUzM2QwYzgwNzI2MWFhNGU4MDFiNWMwYTQ1YTNkYjVjMWZmYWY5YWY4MGVhZmY2Y2UzMzBiJm1ldGhvZF5saXN0fG1ldGhvZF5nZXR8bWV0aG9kPXN1bW1hcnl8bWV0aG9kPXBheXxtZXRob2Q9a2V5c2VuZHxtZXRob2Q9aW52b2ljZSZtZXRob2QvbGlzdGRhdGFzdG9yZSZyYXRlPTYw
Rune Decoding
Once you input a rune, the app will automatically decode it and display it in a human readable form to help you understand precisely all the permissions you are about to grant to the app.
Installation
PWA
Remote is offered as a Progressive Web App (PWA), allowing you to install it directly on your device. Once installed, it provides a user experience similar to that of a native app downloaded from an app store. The PWA is particularly useful for anyone that requires access to their nodes via their cellphone, especially while on the go.
iOS / ipadOS
- Press the share button at the bottom of the screen
- Press “Add to Home Screen”
- Press “Add”
- Then you will see the Remote icon on your home screen

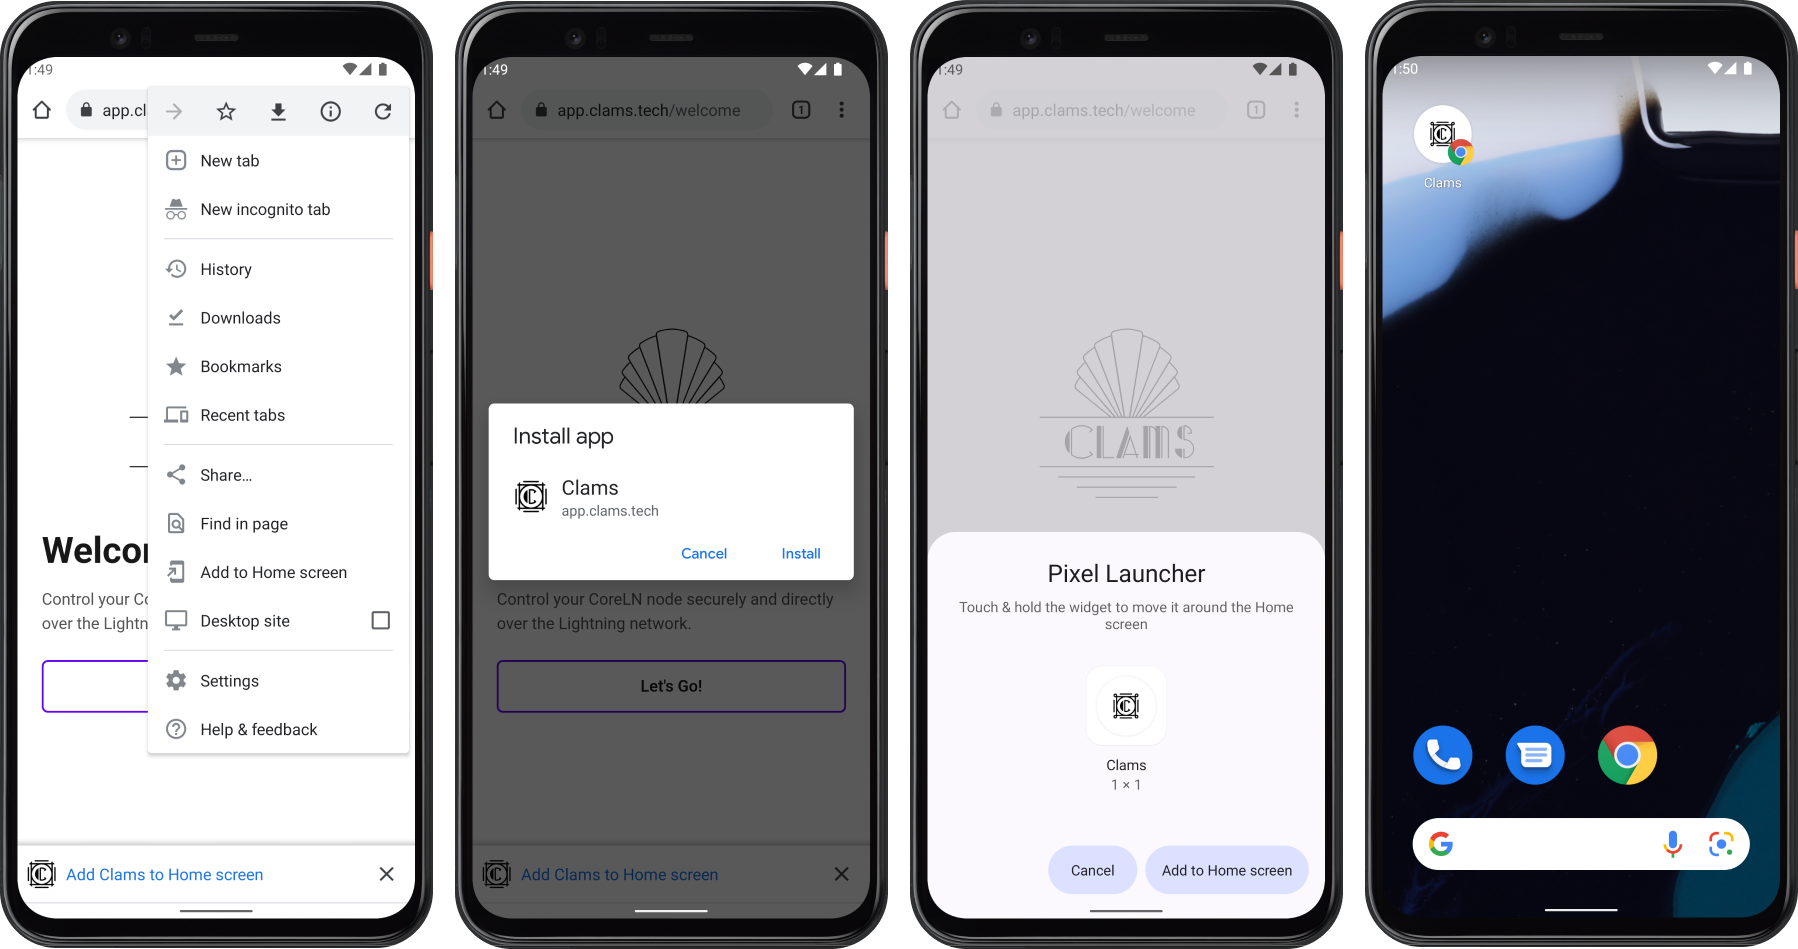
Android
- Press the “Add Remote to Home screen” popup at the bottom of the screen
- If the popup is not there, then press the 3 dots up the top right
- Press “Add to Home screen”
- Press “Install”
- Press “Add to Home screen”
- Then you will see the Remote icon on your home screen
Running a VPN
If you are currently running a TOR only node, or are about to setup a new node, then you will need to make sure that your node is accessible over clearnet before attempting to connect in the Remote app.
You could just simply expose your home IP, but this is terrible for privacy. A good work around is to run a server in the cloud (VPS) that has a public IP which acts as a public front for your node. The VPS has a secure VPN connection to your home node and will forward all traffic without ever exposing your home IP to the broader network.
Some options:
Tailscale
We recommend using Tailscale- and we will have a step-by-step guide added to our docs very soon. For Umbrel node runners, here is a good guide.
Tunnelsats
If you are running one of the node in a box solutions such as RaspiBlitz, Umbrel, Start9 etc, you could try using a service called TunnelSats which provides scripts that will convert your TOR only node in to a hybrid node with clearnet access. They run the infrastructure and you pay in sats for the service for fixed time frames.
Wireguard
If you would like to setup a VPS yourself, the best guide we have found so far for running your lightning node on clearnet via a Wireguard VPN is this video by 402 Payment Required (awesome name btw!)
Testing Locally
To try the app out you can create a local regtest lightning network using Polar and connect Remote to CoreLn nodes.
- Download Polar
- Create a test network with a least one CoreLN node running > v0.12.0 and start the network
- Open up the Docker dashboard and find the running container. Open up the docker compose file in your text editor:

- Find the name of the CoreLN node and add
--experimental-websocket-port=7272to the startup command and expose the port:

- Save the file and restart the Polar network
- Run the Clams app locally:
git clone https://github.com/clams-tech/App.gitcd Appyarnyarn dev-http- Enter the connection address using the public key of the node which is accessible from the "info" tab as well as
localhost:7272. - Click the "Advanced" dropdown -> select direct connection -> select
ws - Click "Connect" and you should successfully connect to the local node.
- To create an auth rune, click the "Actions" tab -> click "Launch which will launch a terminal window for the lightning CLI.
- Run
lightning-cli commando-runeto create a rune and paste it in to the app. - You have connected and authenticated your locally running node!
BOLT12 Offers
BOLT12 Offers is a new standard for invoicing that brings some neat new features that are not possible with BOLT11 invoices (the current standard). You can create reusable static invoices for donations, create a QR invoice request that allows someone to withdraw from your node, denominate in fiat currencies, proof of payment and more. For more info on BOLT12 check out BOLT12.org.
Info
To use the BOLT12 features in Remote, you will need to enable the --experimental-offers flag in your Core Lightning config file.
Creating Offers
Creating an offer is simple and is guided by the BOLT12 payment creation flow for all the needed input. If you want to receive a payment, select pay. If you would like to allow someone to withdraw funds from your node, select the withdraw type.
Scanning and Sending BOLT12 Offers
You can scan (via the scan button) or input manually (by pasting the offer) a BOLT12 offer and the payment flow will guide you through to payment completion.
Managing Offers
You can view all of your current offers listed with a brief summary of each one.
Offer detail
Clicking on one of the offers in the summary list will show you the offer details. You can view all of the payments that have been made via that offer and can click through to see the payment details.
Info
Remote does not currently support the recurrence features of BOLT12, but will support them once they are added back in to the spec.